Hey, everyone. A little over a year ago, I acquired a Panasonic SL-S361C portable CD player from 1999. It had a few minor cosmetic flaws, but it seemed like a solid option for listening to CDs on the go. However, I recently discovered that the batteries in it had corroded, and I knew that I had to address this issue before the player was ruined. So, I decided to give it a much-needed cleaning.
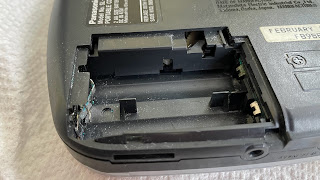
After taking out the problematic batteries, I found that the corrosion was even worse than I had expected. Even after wiping down the contacts with some isopropyl alcohol, there was still a lot of corrosion caked onto the contacts.
Yuck, something needs to be done about that nasty corrosion. So, I decided to take the CD player apart, as it would make cleaning the contacts much easier. I was hoping that this would be a fairly quick and easy process, and surprisingly enough, it was! The whole thing was held together with just a few screws.
There are four screws on the inside of the player that hold it together. At this point, I was starting to become very curious about what might be inside this thing. I’d never taken anything like this apart, so I was surprised once again by just how simple things were inside this compact player. All I found was a single board and a laser assembly. As I had already gathered, this was not an extremely premium device back in its day.
Luckily for me, this player isn’t too complex.
Anyway, with the logic board removed, I figured that it would be a good idea to inspect it a bit. Thankfully, the corrosion only seemed to reach the battery contacts, as it could have damaged some of the traces on the board had it gotten there. Furthermore, the numerous capacitors on the board didn’t appear to be bulging, so it seemed like the brains of this device were in good shape.
It was now time to do something about the corrosion on the board and the case. To address this, I utilized 91% isopropyl alcohol and a toothbrush, and if that didn’t do the trick, I used a flathead screwdriver to manually scrape off the corrosion. It took some time, but this method proved itself to be fairly effective.
Perhaps unsurprisingly, there are some Panasonic-branded chips on the board.
While not pristine, the battery contacts are certainly looking much better now.
I gave all of the components a deep cleaning, including the (not pictured) laser assembly. To be honest, although it was neat to see what this thing looked like on the inside, I was glad to finally be wrapping things up at this point. I reassembled the player, and all that was left to do was to put in some batteries and try it out.
It’s all coming together. When I went to put in some AAs, I was surprised by just how much the battery compartment had improved since the beginning of the restoration. It wasn’t perfect, but I figured that it was more than good enough. So, I put in some batteries and inserted a CD, anxious to see what would happen.
Looking much better. I hit the play button, and to my relief, the player worked flawlessly.
A very 90s album for a very 90s product. Finally, the restoration was complete. While this is hardly the most premium or feature-rich portable CD player ever made, it’s a solid device that does its job. My only complaint is that it can’t read MP3s burnt to a disc, but I can live without that. This is still a very handy little player, and it serves as a reminder that even technology from decades ago can be both useful and fun today.
Success!
Anyway, I hope you found this post interesting, and thanks for reading.
Hey folks! I wrote a short story last weekend that I just needed to share with all of you. I'm so sorry in advance. Enjoy! Everybody Hates Herbert A short story John Spahr
I may no longer be a computer science major, but I'm still fascinated by electronics of all kinds. That's why I take great pleasure in writing about my "everyday carry," that being the devices that I regularly take along with me. These are often being swapped around, as I am an enthusiast at heart, but some of these have stuck around for a long time. So, here's the list: Phone: iPhone 15 Pro (128 GB) It's a very nice phone. That's about all I have to say about it. Like most people, I'm pretty apathetic toward iPhones. I prefer iOS for my needs, and it does what I need it to. 'Nuff said. Laptop: MacBook Pro 14" (2023, M3) I feel bad for my MacBook Pro. It gets tossed around in my bag, is constantly being used, and has a fair few battle scars. But it keeps on going. This laptop has gotten me through college thus far, and I'm hoping I won't have to replace it for a few more years. Watch: Apple Watch SE (the newest one) I swear that this i...
Hey, folks! I did it. I finally got into instant photography. And I love it. Admittedly, I've had some experience with instant photography before now. I got my first instant camera at a thrift store in 2022. It was a Polaroid OneStep from the 90s, and while film was still readily available for it, it was far too expensive to justify using it regularly. As cool as instant photography was, I accepted that it wasn't economically viable for me and moved on. ...Until about a month ago! On one of my first dates with my girlfriend, she introduced me to her Fujifilm Instax Mini 11. It was a much more compact and modern instant camera than my Polaroid. It also used smaller film slides. This was a big deal, as she informed me that the smaller film came at a smaller price. I was intrigued. A couple weeks later, I ventured to Walmart and splurged. I picked up the cheapest Instax they sold: The Mini SE. It only cost about $57, and it came bundled with 10 slides of film. I also picked up an ...